I purchased an NOS Coupe
muffler
from Mike O'Connor to replace my
hole-filled original. It seemed at the outset to be an easy
bolt-on
project. I was a bit clumsy at it but got the job done.
Here's how it went:
The muffler came off quickly. Seven bolts in total (12 and 13mm sockets). Detach the tailpipe from the rubber hanger at the rear of the car (15/16" wrench), and remove the muffler together with the tailpipe. The muffler bolts to two bits of iron that are themselves suspended on hangers. I opted to detach the muffler from these and leave them hanging. You may choose to take the muffler down with the hangers connected. The muffler was "convinced" to separate from the rest of the exhaust pipe; no need to take the whole thing down. There was a fat, metal-and-asbestos gasket still attached to the muffler (the "silencer gasket", according to the parts catalog), but it was pretty much frozen to the muffler and got fairly chewed up when I pried it off. There was another, paper thin metal gasket that tumbled out - it was also quite beat up.
Getting the tailpipe off of the muffler was the fun part. I pried open the pipe a bit at the point where the bolt went through, but not much as I was concerned about the pipe breaking. Some encouragement with a sledgehammer (I banged on the old muffler, away from the tailpipe) was required to separate the two.
When putting the new muffler on the tailpipe, be sure to check the overall length of the two. Otherwise the tailpipe will not line up with the hanger. It's easier to adjust this BEFORE it's bolted back in! (guess how I know this) If you miss this somehow and the pipe sticks out too far, bang it in from the tail, into the installed muffler. A little WD40 at the joint might expedite things.
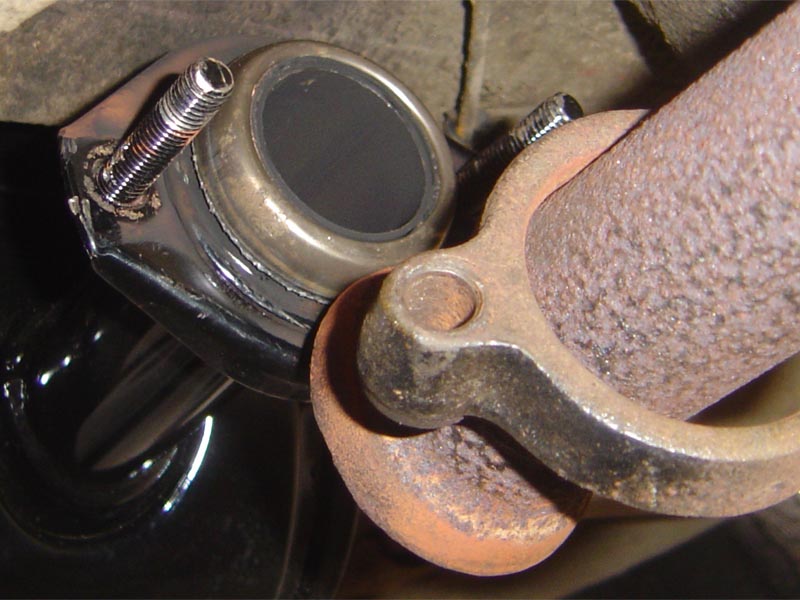
I wrote Mike and bought a replacement gasket to seal the gap between the end of the main exhaust pipe and the muffler. The gasket is a "bell-shaped doughnut" that fits into the bell-shaped end of the pipe. I found that the gasket fit very tightly onto the muffler - if you install one of these and feel the gasket needs some "convincing" to go on, I recommend tapping it on gently with a rubber mallet, so avoid denting the gasket. See the picture below - the gasket is the fat bronze-colored ring. It is made of a soft metal, probably over asbestos - in any event, when the pipe is fastened tight to the muffler I suspect that the gasket takes the shape, creating a nice seal. I left out the other paper-thin gasket as it seemed too beat up. Once put back together, things are much quieter!
Below are the muffler parts pages from the Coupe Parts Catalog.
Note that the connection between the exhaust pipe and the muffler is slightly different than mine.
I believe that the gasket I used is shown as #3 here.
Remember that you can download the entire parts catalog, from this page.
Return to the main page
The muffler came off quickly. Seven bolts in total (12 and 13mm sockets). Detach the tailpipe from the rubber hanger at the rear of the car (15/16" wrench), and remove the muffler together with the tailpipe. The muffler bolts to two bits of iron that are themselves suspended on hangers. I opted to detach the muffler from these and leave them hanging. You may choose to take the muffler down with the hangers connected. The muffler was "convinced" to separate from the rest of the exhaust pipe; no need to take the whole thing down. There was a fat, metal-and-asbestos gasket still attached to the muffler (the "silencer gasket", according to the parts catalog), but it was pretty much frozen to the muffler and got fairly chewed up when I pried it off. There was another, paper thin metal gasket that tumbled out - it was also quite beat up.
Getting the tailpipe off of the muffler was the fun part. I pried open the pipe a bit at the point where the bolt went through, but not much as I was concerned about the pipe breaking. Some encouragement with a sledgehammer (I banged on the old muffler, away from the tailpipe) was required to separate the two.
When putting the new muffler on the tailpipe, be sure to check the overall length of the two. Otherwise the tailpipe will not line up with the hanger. It's easier to adjust this BEFORE it's bolted back in! (guess how I know this) If you miss this somehow and the pipe sticks out too far, bang it in from the tail, into the installed muffler. A little WD40 at the joint might expedite things.
I wrote Mike and bought a replacement gasket to seal the gap between the end of the main exhaust pipe and the muffler. The gasket is a "bell-shaped doughnut" that fits into the bell-shaped end of the pipe. I found that the gasket fit very tightly onto the muffler - if you install one of these and feel the gasket needs some "convincing" to go on, I recommend tapping it on gently with a rubber mallet, so avoid denting the gasket. See the picture below - the gasket is the fat bronze-colored ring. It is made of a soft metal, probably over asbestos - in any event, when the pipe is fastened tight to the muffler I suspect that the gasket takes the shape, creating a nice seal. I left out the other paper-thin gasket as it seemed too beat up. Once put back together, things are much quieter!
Below are the muffler parts pages from the Coupe Parts Catalog.
Note that the connection between the exhaust pipe and the muffler is slightly different than mine.
I believe that the gasket I used is shown as #3 here.
Remember that you can download the entire parts catalog, from this page.
Return to the main page